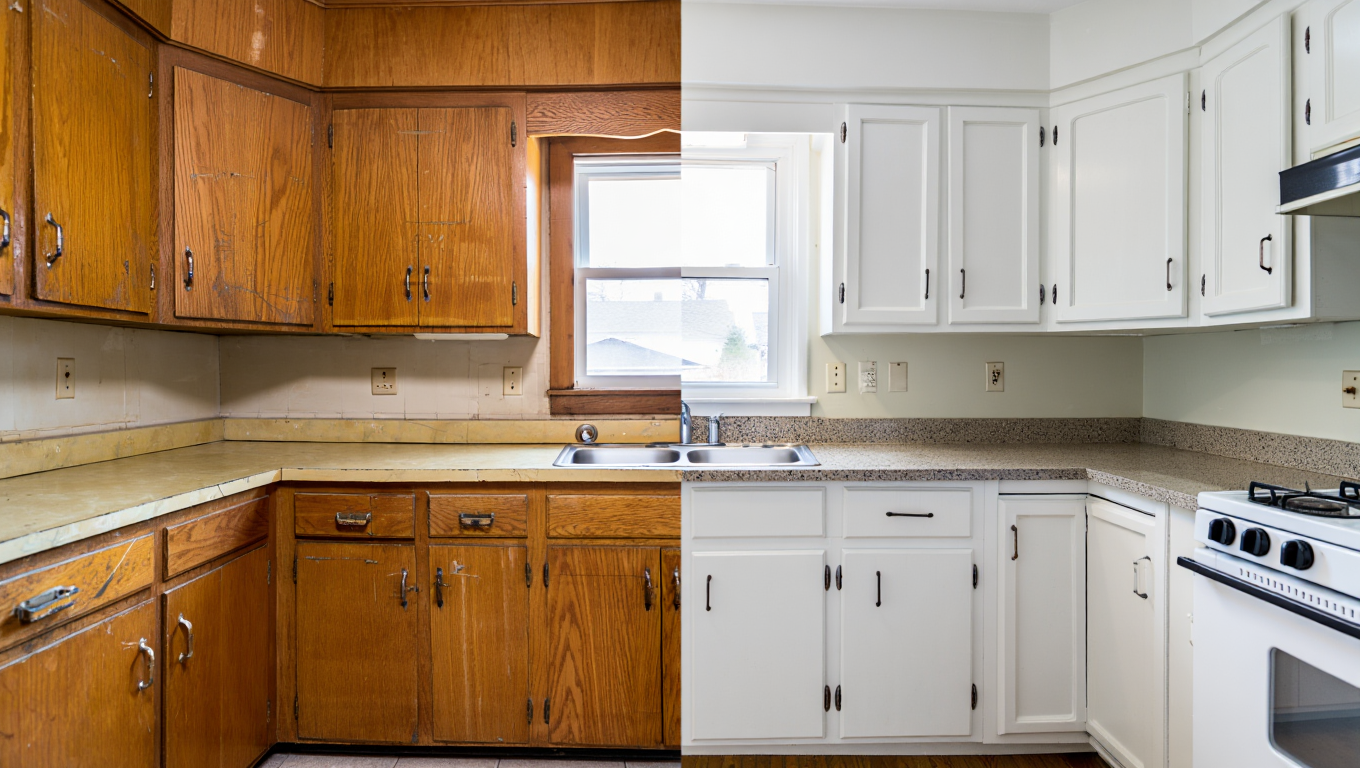
You know the cabinets I’m talking about. That orange glow of 1990s Golden Oak. The sticky film near the handle above the stove. The worn spots where your kids’ backpacks hit the doors every morning.
Here’s the thing. Your cabinets aren’t broken. They’re just tired.
Most Utah homeowners face this decision: scrub harder, or tear everything out and start over. But there’s a third option that makes more sense for solid wood cabinets. How to make old wood cabinets look new isn’t about products you buy at the hardware store. It’s about understanding what actually failed.
The finish failed. Not the wood.

Why Old Wood Cabinets Look Worn
The finish on your cabinets takes the beating. Not the wood underneath.
UV rays from that west-facing window fade the color. Grease from cooking jumps from the stove and settles on the doors above it. Every hand that opens a drawer wears down the protective barrier a little more.
In Utah’s dry climate, there’s another problem. Wood moves. It contracts in winter when the furnace runs. It expands slightly when you turn on the humidifier. That movement creates hairline cracks at the joints where the door frame meets the center panel. The finish can’t flex. So it separates.
This is not a paint failure. This is wood doing what wood does.
What Actually Makes Cabinets Look “New” Again
People confuse three different things.
Cleaning removes dirt and grease. It makes cabinets cleaner. Not newer.
Cosmetic touch-ups hide scratches with markers or fill sticks. They help you sell a house. They don’t restore durability.

True refinishing strips or covers the old barrier and builds a new one. It’s the only method that brings back factory performance.
The difference matters when you’re deciding what to spend.
Cabinet Cleaning vs. Refreshing vs. Kitchen Cabinet Refinishing
When Cleaning Works
If you can wipe it off, it’s dirt. Use dish soap and water. That’s it.
A lot of homeowners think their cabinets are damaged when they’re just greasy. The area above the stove collects vaporized cooking oil. It turns into a sticky film that catches dust. Twenty years of that film looks terrible. But it’s not structural.
Try this first. Get Krud Kutter or a similar degreaser. Follow the directions. Wipe with a damp cloth after to remove residue. If your cabinets look better, you just saved yourself a lot of money.
When Refinishing is the Only Real Fix
If the finish itself is failing, no amount of cleaning or oiling will fix it. Failing finish looks like:
- Peeling or flaking (usually near moisture)
- Cloudy areas that won’t polish out
- Bare wood showing through at wear points
- Cracks at panel joints that expose raw wood
That’s when you need to remove or cover the old finish and start over.

How Professional Cabinet Refinishing Works
We take the doors and drawer fronts to our shop. The cabinet boxes stay in your home. This is not optional. It’s the only way to get a factory finish.
Step 1: Degreasing
Every surface needs to get degreased. Even the ones that don’t look greasy. Oil migrates. If there’s any residue, the new finish won’t bond properly.
Before we arrive, you’ll need to degrease the cabinets above the stove. We recommend Krud Kutter. Pay attention to the top edges and grooves where grease accumulates.
Step 2: Sanding
We don’t sand to remove the old finish. We sand to create tooth. The new primer needs something to grab onto.
For oak cabinets, we also address the grain at this stage. Oak has deep pores. Without grain filler, those pores telegraph through the paint. With multiple coats of grain-filling primer, the surface becomes almost smooth. Not totally smooth. Almost
Step 3: Priming
Two coats of primer. Not one.
The first coat seals the wood and provides adhesion. The second coat builds thickness and creates a uniform surface for the topcoat. We sand lightly between coats.
For cabinets with knots, we take extra steps to prevent bleed-through. Knots contain tannins that can push through white paint over time if not properly sealed.
Step 4: Spraying the Finish
Two coats of finish. Sprayed. Not brushed.
We use either Benjamin Moore Satin Impervo or Milesi 2k polyurethane. The 2k poly is what car manufacturers use. It cures chemically, not by evaporation. That means it’s harder and more durable than any brushed-on product.
The result looks like it came from a cabinet factory. Because the process is the same.

When Kitchen Cabinet Refinishing Makes Sense
Good Candidates
Solid wood boxes. Face-frame construction. Doors that close properly. Good layout.
Most cabinets built in Utah between 1980 and 2010 fall into this category. The bones are good. The finish is tired.
If your cabinets are solid wood and the layout works for how you cook, refinishing saves you 60-70% compared to replacement. You keep the existing boxes. You keep your backsplash. Your countertops don’t have to be cut again.
The Long-Term Result
A properly refinished cabinet will outlast a DIY paint job by years. Not because we’re better with a brush. Because we use better chemistry and proper prep.
The 2k polyurethane we spray carries a lifetime guarantee. Not one year. Lifetime. It won’t chip from normal use. It won’t yellow. And if something happens that you can’t touch up yourself, we come back.
Benjamin Moore carries a one-year guarantee. It’s still dramatically more durable than any hardware store product. And you can touch it up yourself with a small brush if needed.
The ROI
Full cabinet replacement in Utah runs $15,000 to $40,000 depending on quality. That includes new boxes, new doors, installation, and often new countertops because the dimensions change.
Professional refinishing runs $4,800 to $8,000 for most kitchens. Same cabinets. New finish. No construction mess.
If your cabinets are solid wood, refinishing makes sense. If they’re falling apart, replacement makes sense. Most homeowners are in the first category.
If the structure is solid and the layout works, the finish is just maintenance. You wouldn’t replace your car because the paint faded. You wouldn’t tear down your house because the siding needed refreshing.
Cabinets work the same way.
Most cabinets built in the last 40 years in Utah were built to last. The wood is fine. The joinery is fine. The finish is what needs attention.
If you’re looking at your cabinets and wondering whether they’re good candidates for refinishing, send us a few photos. We’ll tell you honestly whether it makes sense. Sometimes it doesn’t. Most of the time it does.
No pressure. Just an honest assessment from people who’ve been refinishing cabinets in Utah for over a decade.
Allen Brothers Cabinet Painting serves homeowners across Utah counties. We specialize exclusively in cabinet refinishing using factory-grade processes and professional-grade finishes. Submit a request below or call (801) 231-6428 to see if your cabinets are good candidates for refinishing.
Get a Free Quote
"*" indicates required fields